


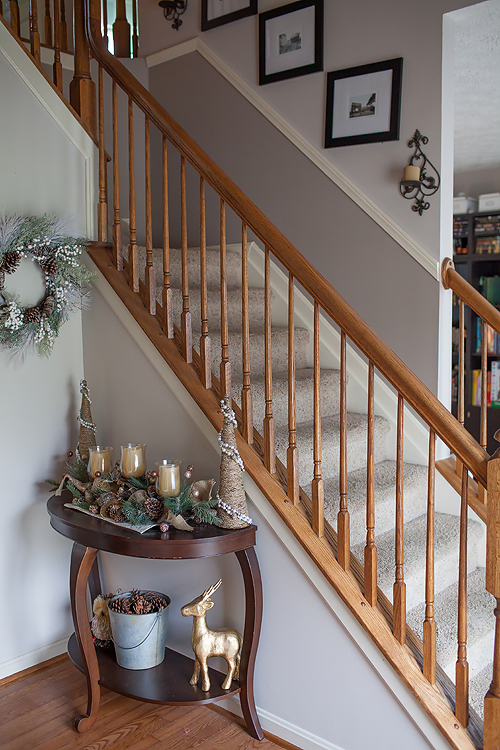
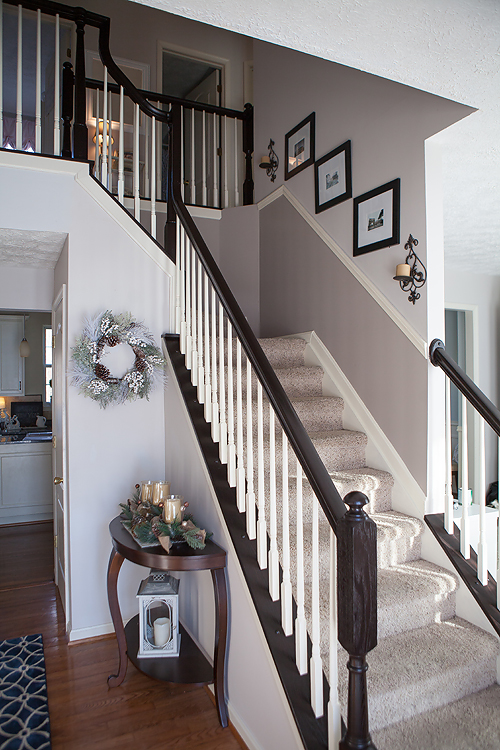
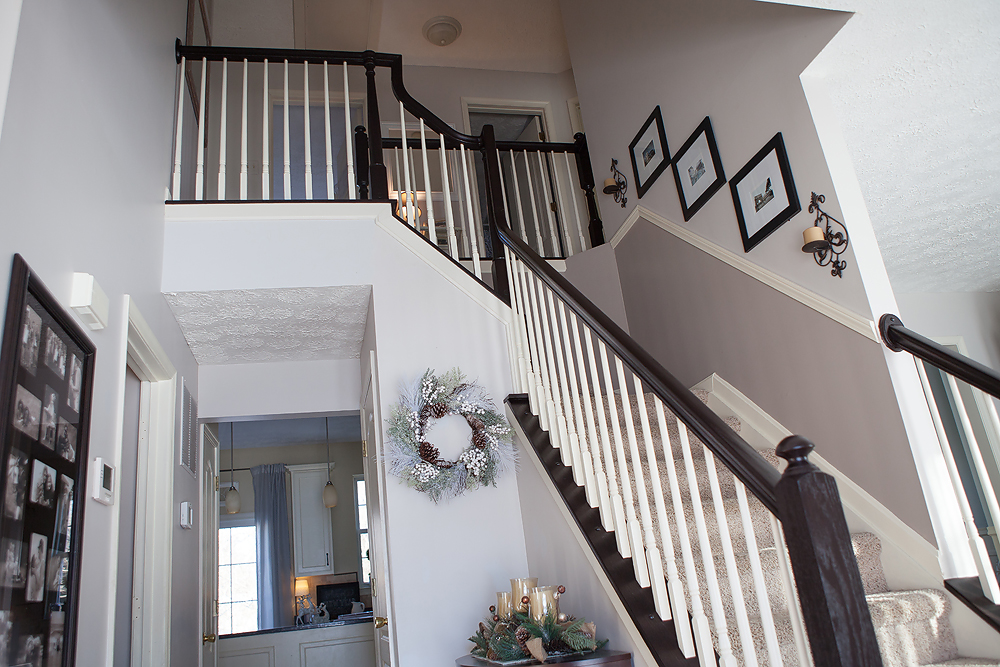
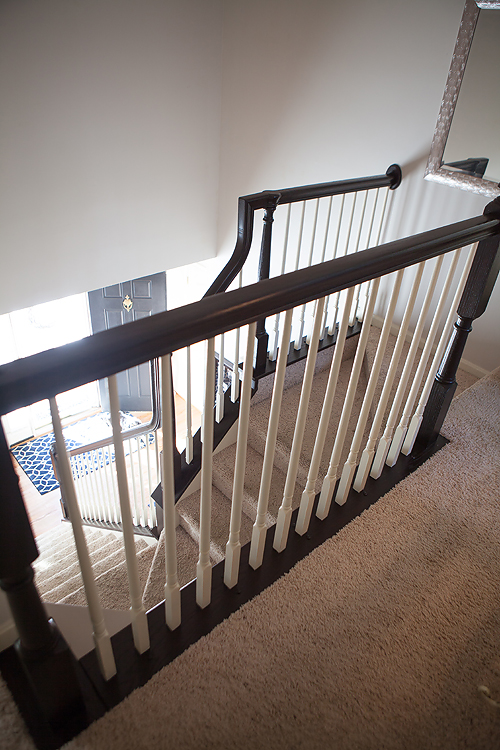
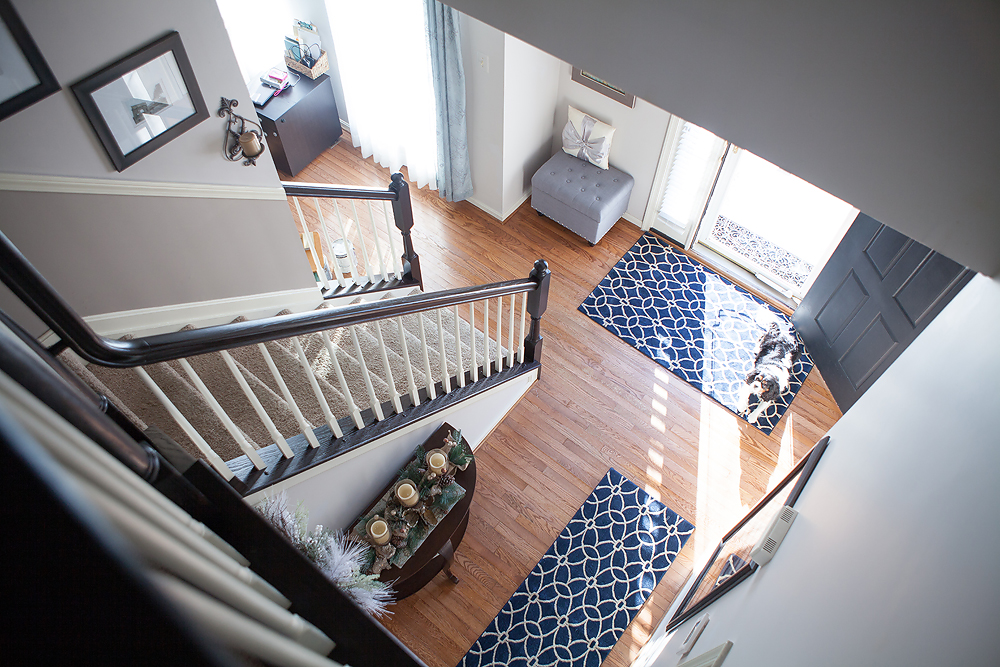
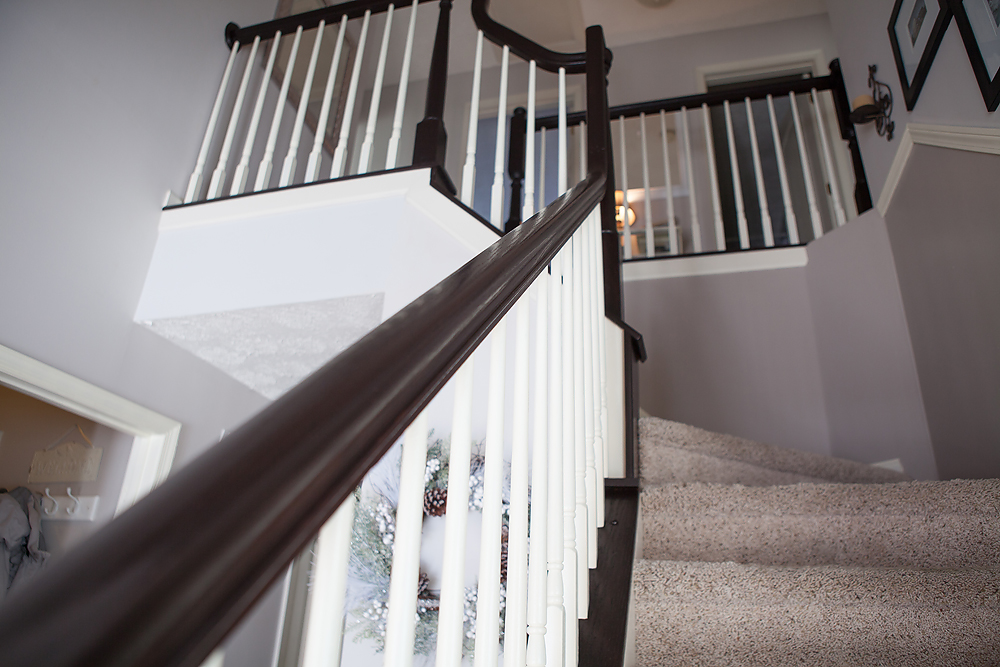
DIY – How To Stain and Paint Oak Stair Banisters
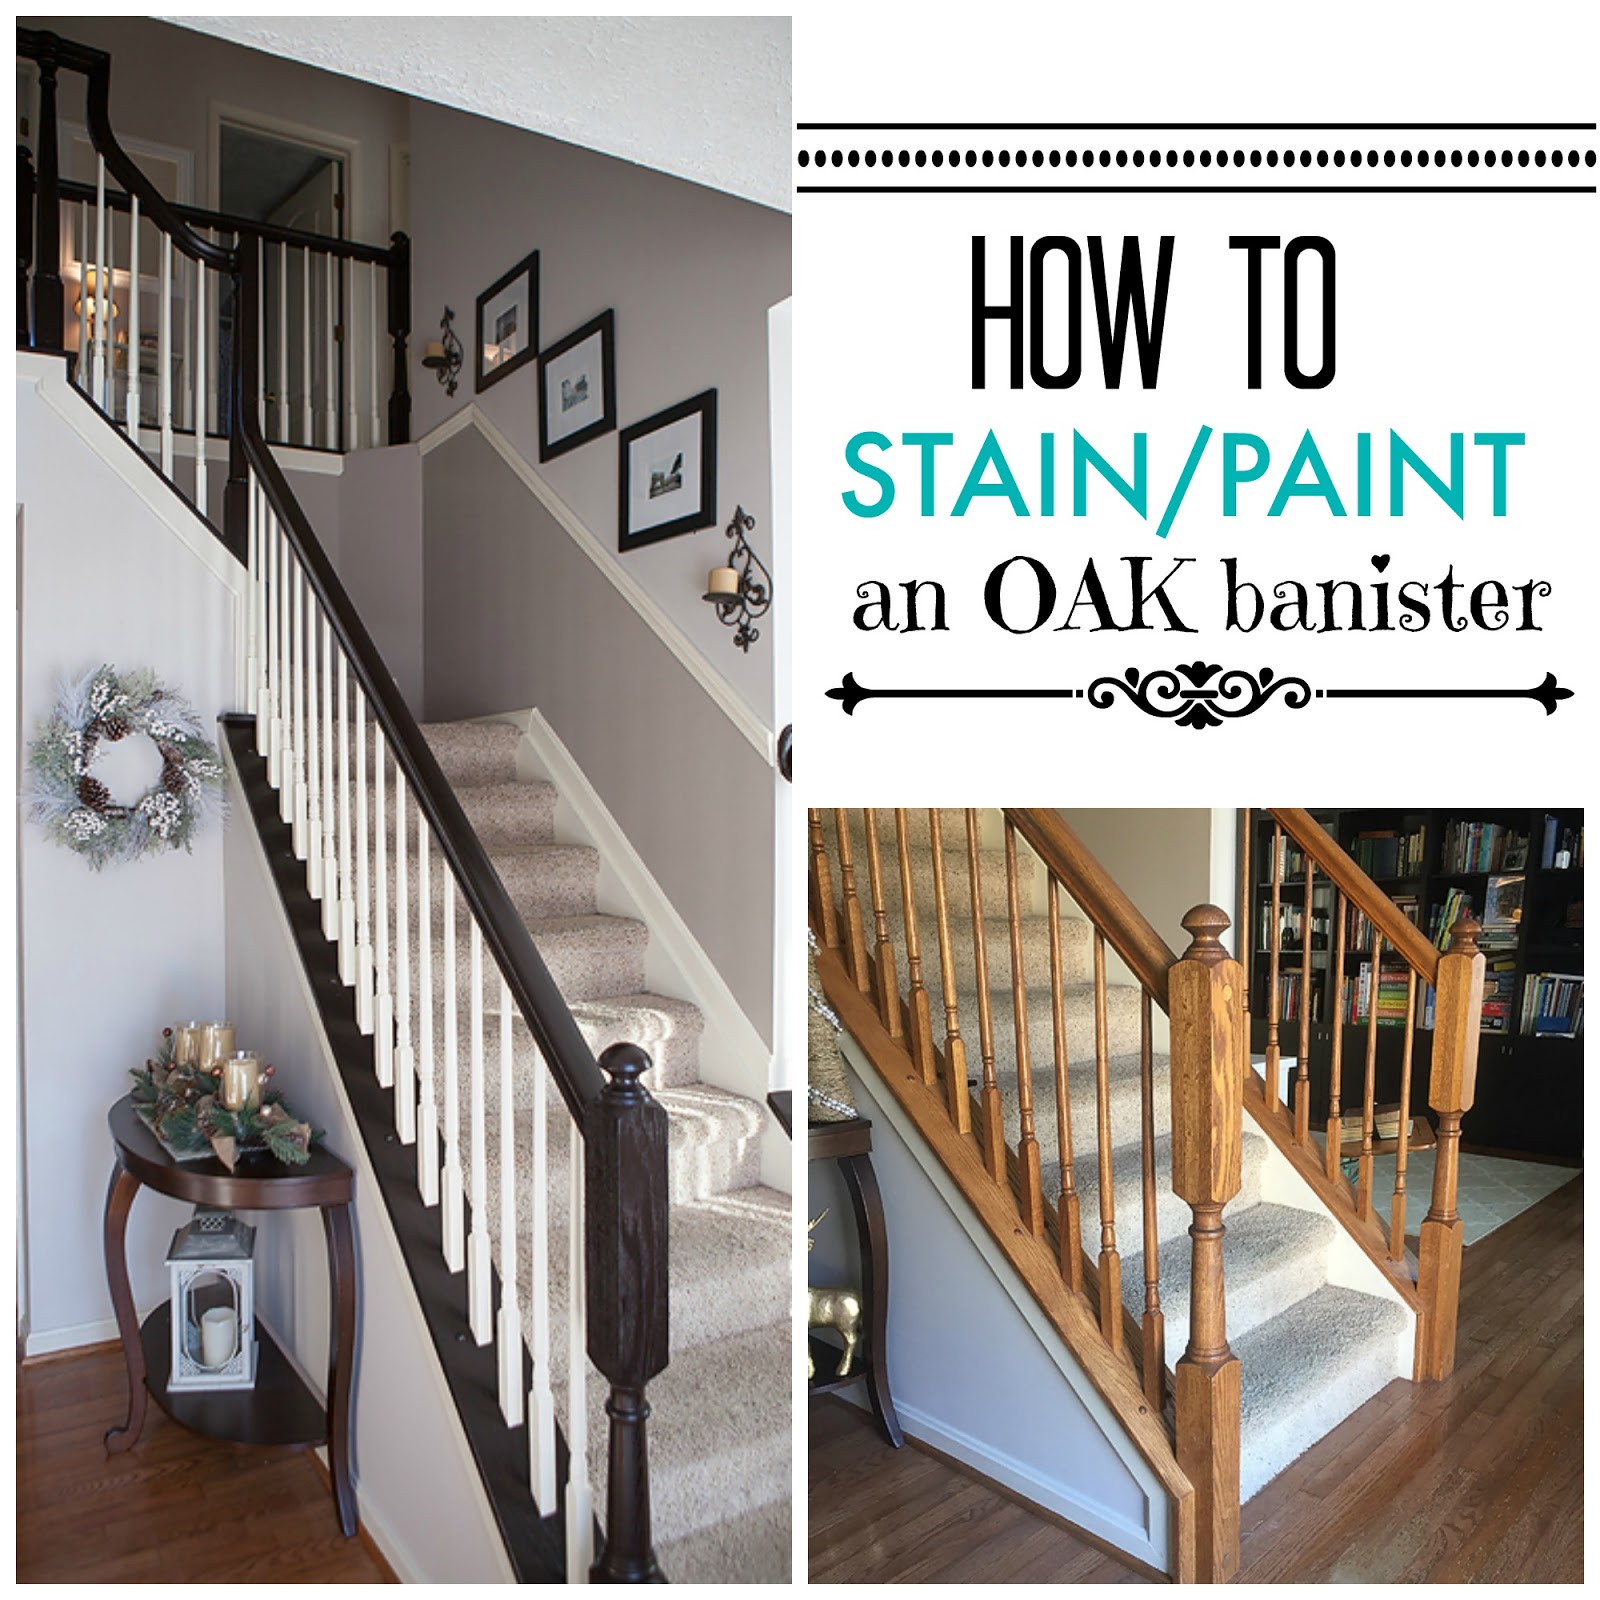
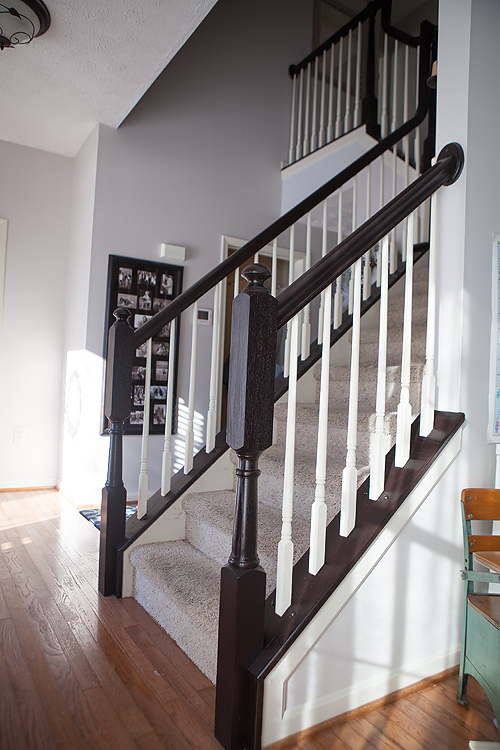
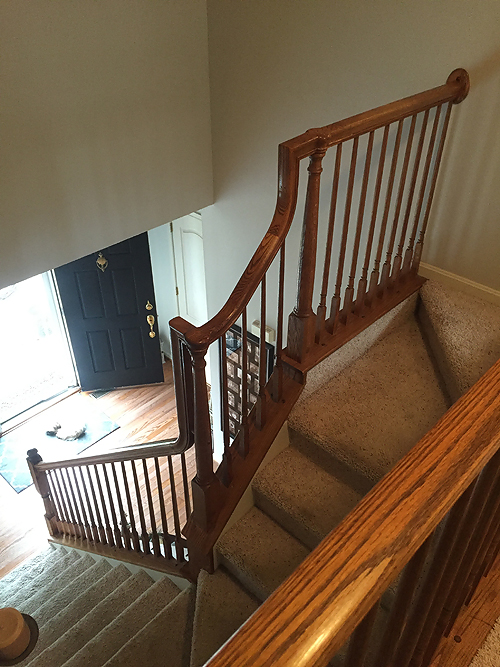
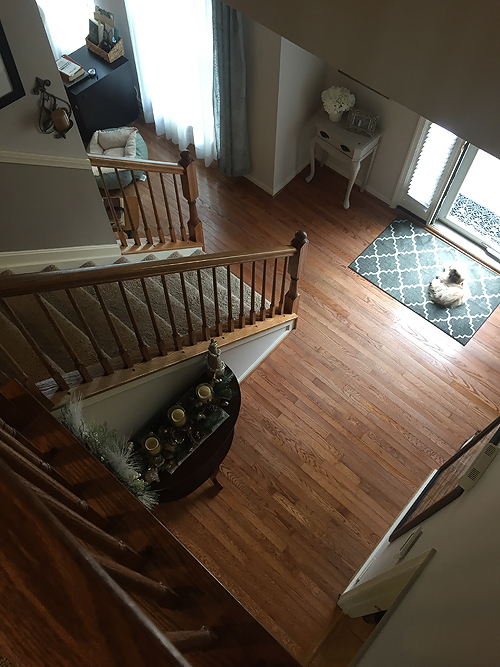
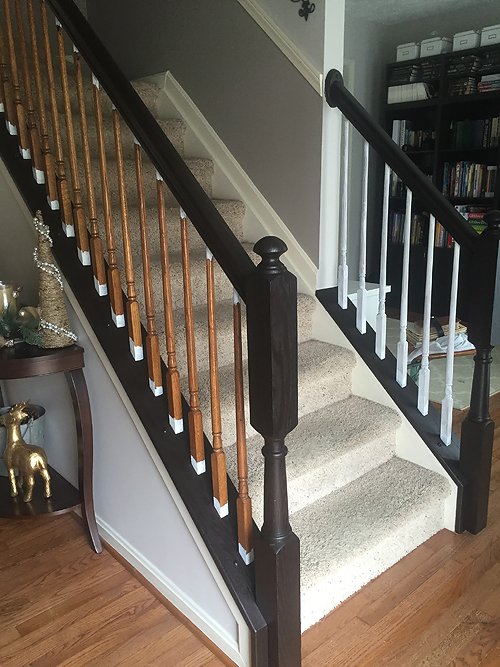
I finally tackled those outdated ugly orange oak stair banisters! What a difference it makes, right? It really is very easy to do, and it barely even cost a thing – I spent maybe $50 at most. Take a peek at some of the before and after pictures…..
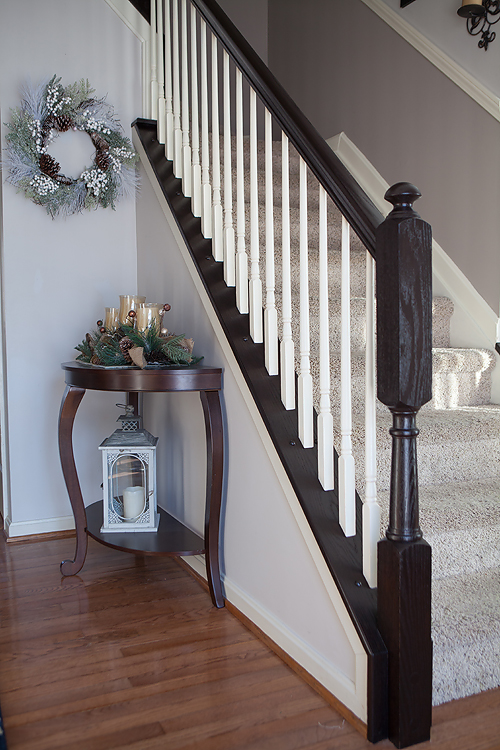

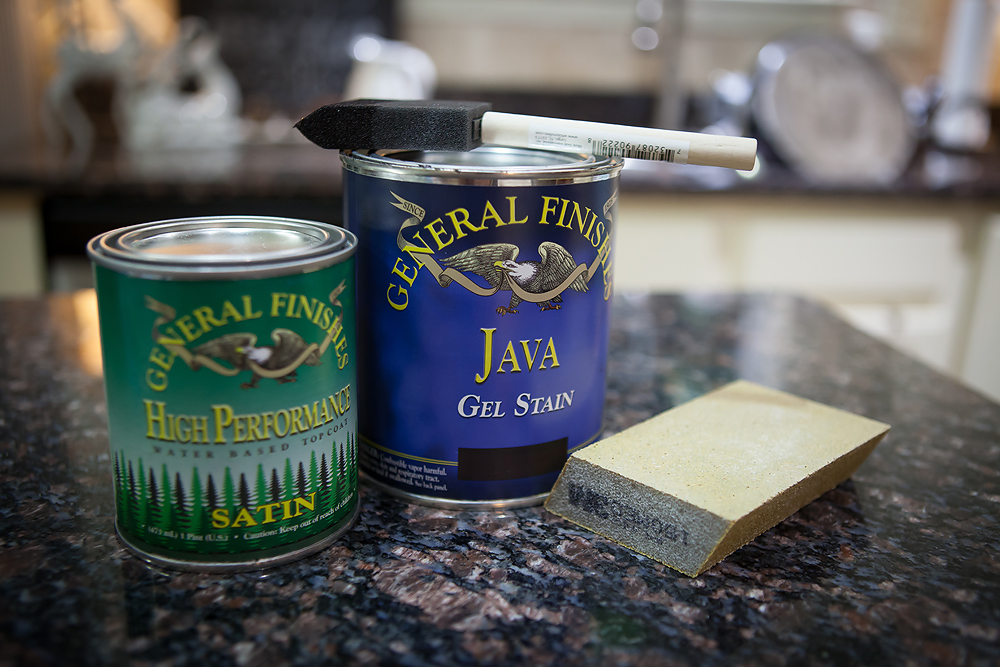
To get started, you need a small sanding block, the brand General Finishes stain in the color Java. I only needed a quart – and still have plenty left. Also, the same brand in a polyurethane for the top coat. I only ordered a pint, and have more than half a can left. I ordered the satin finish because I didn’t want it super shiny. Foam brushes work the best – I tried out several and kept going back to the foam. In all the research I did for this project, one thing I discovered is everyone said not to use any other brand stain gel than this one – General Finishes is the brand to trust.
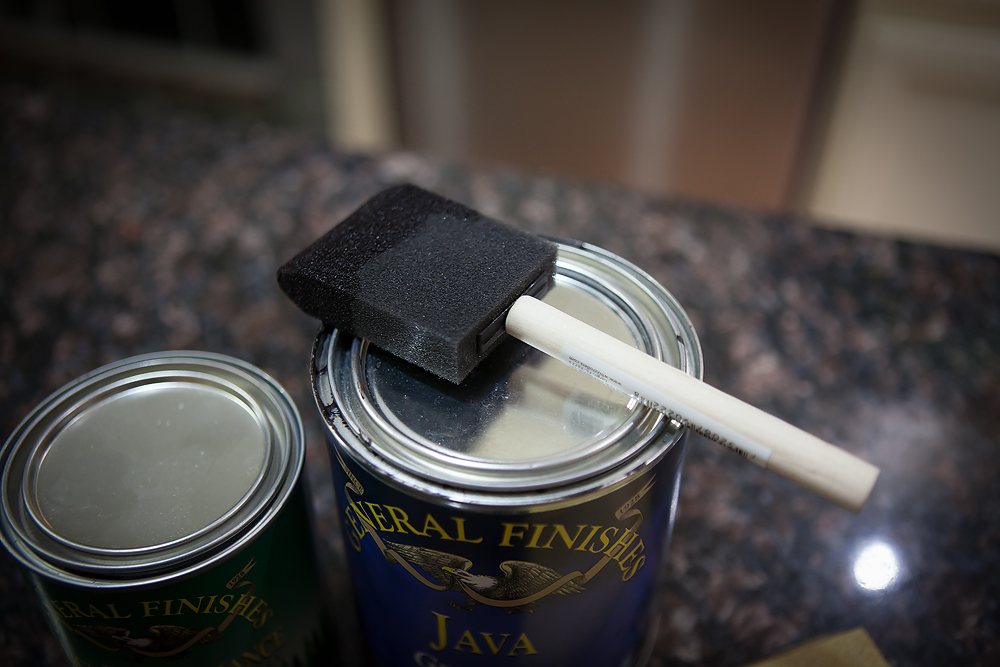
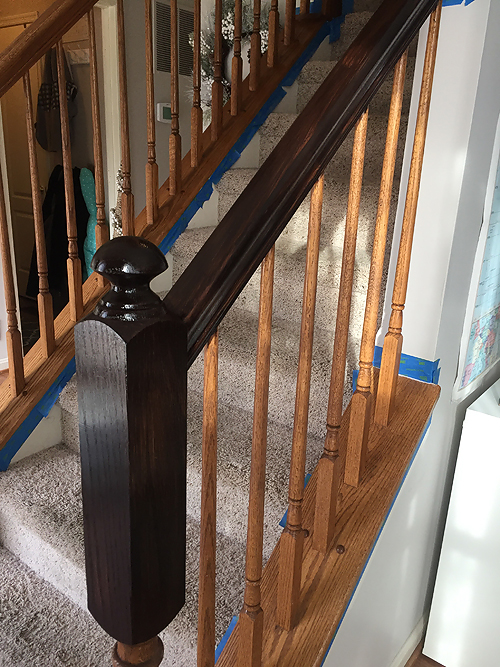

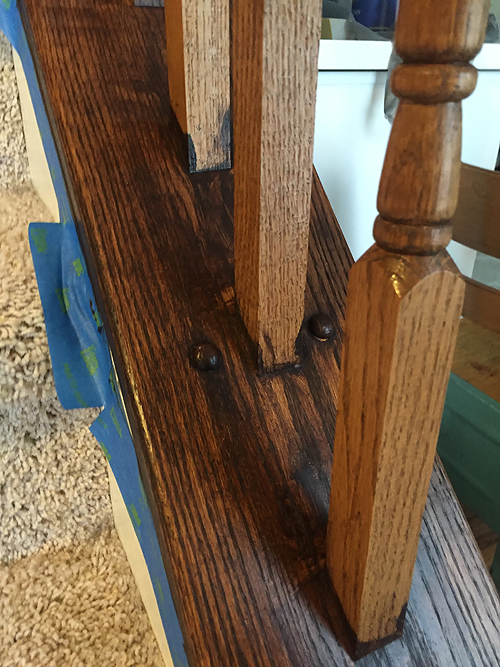
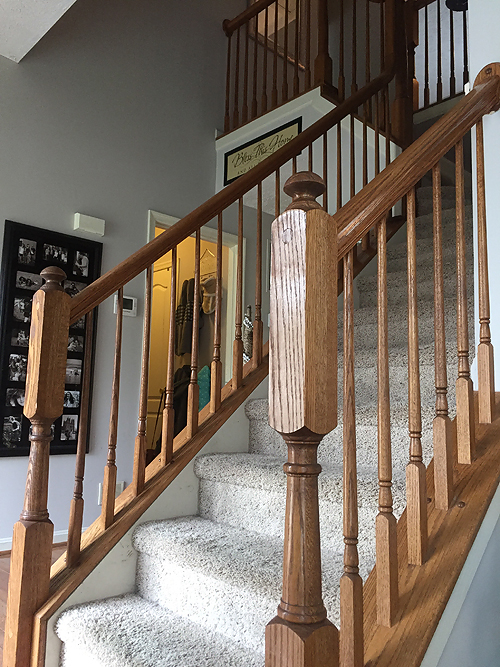
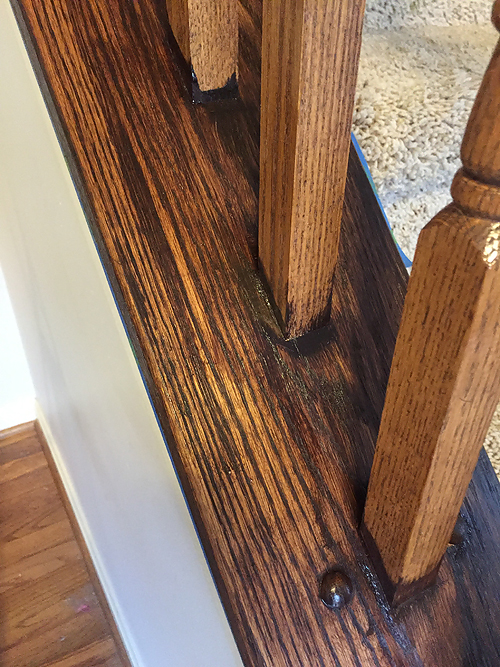
Be SURE you have some gloves to wear before you start staining. I found some at Lowe’s for just a few dollars, several pairs in a package. This stain does not come off your hands very easily. I did have mineral spirits close by and it came in pretty handy at times. Using your foam brush, paint on the gel stain making sure to catch any drips or clumps. This stuff is really thick, but goes on smooth. The directions on the can say to paint a coat on, let dry a few minutes and then wipe off. I did that at first as you can see here in this picture above. It made a huge mess and I felt like it was counter productive. The rest of the project, I ignored the “wipe off” step and it worked so much better. I did the first layer of Java in just a few hours and then waited until the next day to do the second coat. After two coats, I felt pretty good about how it looked, and just did some touch ups here and there where I felt it was needed.
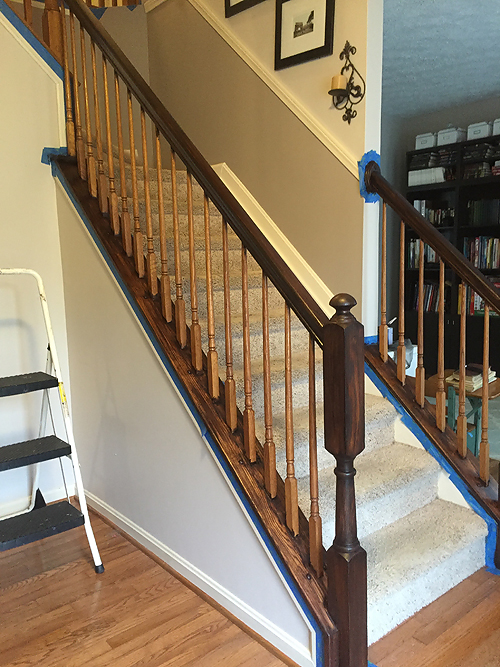
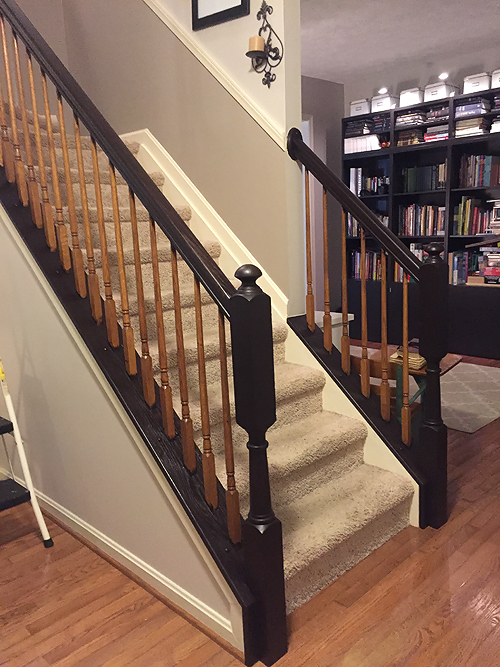
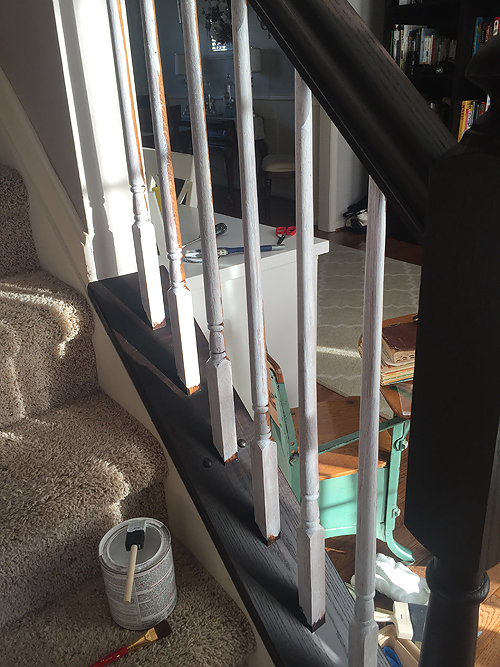

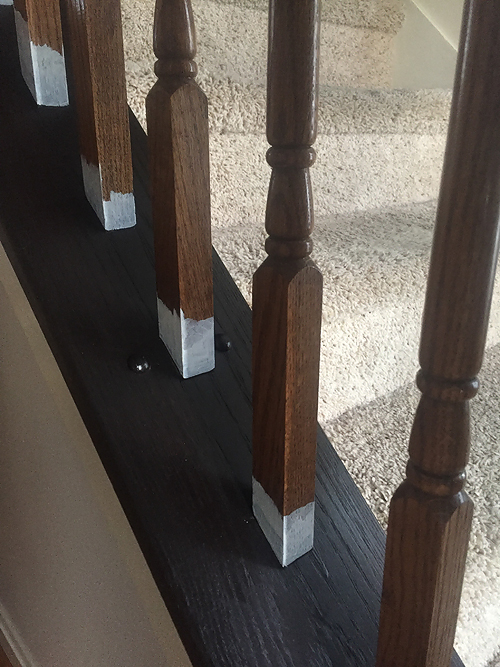
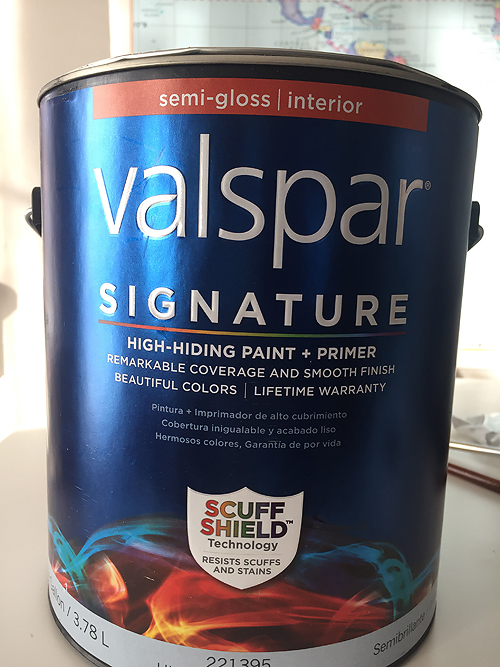
After I was happy with how the java looked, I started priming the spindles. This was the trickiest part of the project. I used a small art brush and free-handed all the edges where the spindles met the Java stained wood. I used a foam brush for the rest of the spindle. Any other brush I tried left tiny splatters of white on the freshly stained java. Um – NO. The foam brush was the best. I did 2-3 coats of primer, and then three coats of paint. Put on a great audio book or listen to some podcasts. It was a great time to catch up on some of my favorite homeschool podcasts! If you want to listen to some great ideas on education, have a listen to some audio recordings from the Circe Institute. My favorite was “A Contemplation of Nature” – WOWSA. Have a listen – and happy painting.

Here’s a funny – I had a rub-on decal just above the stairs that I wanted to remove to finish painting the gray wall color over it. My sweet Banana offered to take over for me and when I stepped down off the ladder, I just happened to stop peeling at a very in-opportune time. We had a really good laugh over it though!


Leave a Reply
HEATHER IS AN AWARD WINNING professional dance AND PORTRAIT PHOTOGRAPHER since 2007. SHE HAS BEEN RECOGNIZED, AWARDED AND PUBLISHED IN THE FOLLOWING PUBLICATIONS AND MORE.
in the press


")

")
")

")


")
Looks beautiful! We are on day three of having our floors refinished and can't sleep at home because of the fumes. I chose to not have the stairs done, because it was another $500 and I figured I could do it myself. But I didn't think about the smell. Was it really bad? Our floors are so bad, I got a headache just sitting in the backyard!
Hi, I was wondering how long you waited in between coats for the white spindles? Thanks 🙂 Will be doing this asap to my banisters!
I didn't wait very long at all between coats on the spindles. Probably just a few hours? Michelle – I didn't have any problems with fumes from the stain, it wasn't bad at all.
I just started this project and can't wait for the finished product! I was wondering if you would share the color of paint on your walls? I love it too.
This is such a great tutorial and it looks gorgeous! What grit was the sanding block?
Hello,
We are about to get rid of our gym floor staircase oak too! I LOVE what you did, it is so pretty! Do you mind telling me what paint colors you did on the wall up the staircase? The two colors with the chair rail is such a nice contrast. Love it! Thank you!
Hi, I love your tutorial! I'm doing this asap 🙂 one question.. you said you used 2-3 coats of primer and 3 coats of paint. But you only show the Valspar can, which is a paint and primer in one. Which step did you use the Valspar can for (paint or primer)? And what did you use for the other step you didn't use the Valspar for? Or did you only use the Valspar can?
Hi!! Thank you fir sharing this, I'm curious, did you not sand anything prior to painting? We are starting our railing and we thought you had to sand down the areas first? We are painting (have the same paint as you), not staining. So confused on this! Thanks!
what color of stain gel is that? It almost looks black.
This looks amazing!! Question – what sandpaper grit did you use? And did you do any sanding between stain or poly coats? One more 🙂 what color are your walls?? Starting this project soon – thanks so much for the info!
I have a few furry animals in my house. How long did the gel stain take to dry after you applied it? I know you waited till the next day to put a second coat on but I'm wondering how long I have to be all protective of my railings.
Thanks for your blog post. I am about to move into a new home that too has orange oak banisters. This will be a great Christmas project with 2 weeks off from work. 🙂 Thank you for the detailed pictures! …great for a visual learner such as myself.
What is the brand and color name of the paint you used on the walls?
How long did you wait before you put poly on the handrail and treads? I am doing handrails without wiping off excess. Planning to do spray shellac and poly as soon as it dries
How long did you wait before putting poly on ? I am doing our handrails without wiping off excess and topcoating with shellac and poly.
How long did you wait to put on poly. I am doing our handrails without wiping off excess and top coating with shellac and poly.
I am curious how your banister has held up since you refinished it? Have you had to do much touch up work? Is there anything you would have done differently?
This is EXACTLY what I was looking for – thank you sooooo much – I was hoping it would be straight forward
I love that java gel stain! I redid my whole kitchen and bathroom downstairs with it and they look 1000 times better than that yellow oak! Lol looks great! I’m glad I found this post because I was thinking of using the Java to stain my banister. Looks like that’s what I will be doing in October! Thanks!
Hello,
What paint color did you use on your walls?? You
Hello
What paint color is on your wall?
HI,
I have the exact (orange) oak spindles at my house! Am waiting for a Fall day to take this project on. Can I ask you the color grey on the bottom of the moulding going up the stairs you used. I really like to two tone effect. Thank you! 🙂
Very helpful Thanks !
Looks amazing and thank you for posting. May I ask what paint color is on your walls?
Hi ~ have a question on color
From he pic ~ this looks black. Is it a true black or a very dark brown ?
Thanks!
Hi Heather! This is beautiful.thank you for the tips and tricks for painting the bannisters. I’m hoping to tackle this soon.
Just wondering what colors of grey paint you used for the walls. Thanks! Lori
What color is the brown?
What color is the java stain and is the pint of poly clear
The color is called java and yes the poly is clear.